Tuesday, April 14, 2009

Modernizing the DMC-12's Rear Suspension: Options, Resources, & Overview

Introduction
I have nearly a complete set of parts and service history for 2109. Being a total geek, I spent a weekend afternoon once putting those in Excel. It was a worthwhile exercise because at a glance I can see what part (and if it) was replaced, and when. I am a strong believer in preventive maintenance (PM), so having quick access to that information assists me towards implementing PM on 2109.

Being a high mileage car (80K, relatively high for a DeLorean) means that it has been enjoyed by by its owners in the sense that it has been driven and not stored.  It also means that a lot of components have been changed, updated, or maintained. One of the most obvious components and service work that has not been performed, was on the suspension, she was still riding on 28 year old shocks and related components. I can’t complain, the ride is not bad, a little jolty on the occasional bump, but those old struts (non leaking by the way) must have seen better times. So, suspension work eventually made it to the top of the list of things to do, and I would start with the easiest, the rear.

I decided to attempt to do the rear suspension myself based on the fact that a) after research and speaking with others, that it didn’t seem too complicated, and b) I could save a few bucks from my budget and invest them in parts, rather than on labor. My backup plan as usual, if I get too over my head, I could always flatbed the car to DMC Florida.

Rear Suspension Work
Being on a budget also dictated that I had to buy the parts that I needed over a period of time, and not at once. So in approximately a 6-10 month period, I had all the parts that I needed to begin. Here are some notes, on some of the major components that I chose to use, and why:


Springs:

With respect to the springs’ contributions to overall height, I actually do not mind my car’s stock rear height (picture above). The fronts, aesthetically yes, that needs to be lowered, but not the rear. This then simplified my choices as I would be reusing the existing springs.

Here is how the springs came out of the car:


Here is how they looked after some metal prep and several coats of satin black paint.

It took some work, but it turned out well enough that when another owner saw them, they thought that I had bought new ones.

Notes on springs thatlower the rear end:
Spring options for those that wish to lower their car’s rear height are: 1) use your front springs, in the rear, 2) use DMC’s Eibach’s lowered springs, or 3) cut your rear springs.


These are DMC's Eibach Performance Spring Kit:


If you do decide to lower the rear height, be aware that you must also replace your lower link, with an adjustable version, and have the wheels realigned for proper camber. If you lower your car’s rear stock height and you do not use an adjustable lower link, the camber of your rear tires will be off, and cannot be adjusted, which will result in the inside treads of your rear tires will quickly begin to show excessive wear.
This is what the adjustable rear links look like:


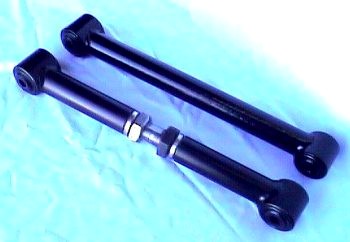
(Picture from midstatedmc.com)

These adjustable links are available directly from:
DMC Midwest
DeLorean Mid-State Club
DMC California
Pricing information varies per site, some require cores, some require your links to be sent in to be modified, Dave at DMC Midwest stocks them ready to ship. Reference individual links above, and contact them, for additional details.


Shocks.
Here we have quite a few choices. I'll list them in no particular order:

DeLoreanUpgradeParts:


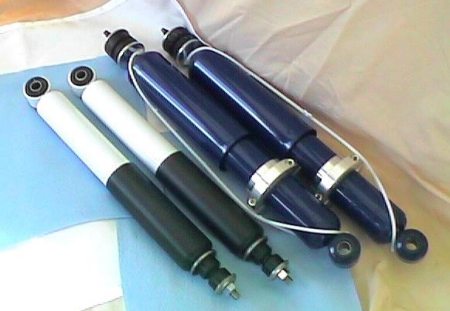
SpecialTAuto has two different kinds of shocks.
"Easy Riders" (Front & Rears as a set)


...and the "KYB Performance" shocks (front & rears sold seperately, rears shown below)


DMC sells a full set as part of their Eibach System (and actually NOS Girling ones too). They are sold as fronts and rears together.  Shown below is their full Eibach Performance System, but shocks and springs are sold seperately as well.  This is a popular configuration and nearly all installation reviews are favorable.


Marty Meier at Delorean Mid-State Club, has a front and rear set (with a lot of positive reviews posted).


Ed at DMC Europe has a unique set as well, part of his "Power Series", the "Power Shocks", which feature adjustable damping settings and polyurethane bushings built in.  Both front and rear shown below, but they can be purchased separately.


I have heard of a UK source for some shocks similar to Ed's, from the UK, and the shocks are brand: "Spax". If someone can email me public link, I would be glad to post pictures of them here, along with a reference link.

EDIT (05/11/09): I found the link, am fairly certain it is their "KSX" shock (picture from link below), but you'll have to call them for more details.

EDIT (05/17/09):
Chris Williams, the Secretary DeLorean Owners Club UK, has provided the further information and some detailed pictures of the SPAX shocks. He wrote:

"The well known company for performance shocks (SPAX) have agreed to start manufacturing shock absorbers (dampers) for our cars.  They are gas adjustable front and rear, with the rears being adjustable for the spring height on a S/Steel threaded outer tube. Fully Gas adjustable, with 28 settings on the adjusting knob. Spring height is also adjustable as you can see from the pictures.
Prices will be about, £74.99 each for the fronts and £99.99 each for the rear. There is 25% discount on these prices for DOC club members."
Rear SPAX in comparison to OEM. Take note of Stainless collar threads, AND a protective sleeve over the piston rod, two unique features of this shock absorber:

Close up of the bottom of the rear shocks, with the knob for the adjustable dampening settings:


I have to say that on features alone, this does appear to be a very interesting alternative, for replacing the rear shocks.
Edit: (05/26/09)
For more information on these, Chris says to contact Spax directly at: http://www.spax-suspension.co.uk/contact_us.php
If you tell them you are a DOC (DeLorean Owners Club) member, you get a 25% discount.  . . . Chris says that Spax does not call him to verify membership.   ; )

Edit: (02/22/10)
These shocks are now available domestically, exclusively through
SpecialTAuto.


Overview of which to get...
Which one to go with is honestly a leap of faith, and balanced by what are your driving expectations, and of course funding availability. Some are touted as “performance shocks” which give a stiffer ride, but hold tighter on aggressive turns and driving. Others are “touring shocks” which would mean a softer, cushier ride, which is not for everyone.

I drove a fellow D owner’s car with SpecialTAuto’s “Easy Riders” and I liked them, it was a soft ride on a less than great parking lot, and on a smooth open road at 50mph. I have heard others complain they are too soft, and in response John has released a stiffer 2nd option as shown above.

If you search you’ll find all sorts of opinions on installed solutions, but what is missing and we’ll probably never see, is a side by side comparison of multiple solutions, on the same vehicle. So really the best that could happen then to assist you on your choice, is to be able to have the opportunity to ride in as many cars as possible with the different shock and spring options, for you to evaluate personally, to make the best choice for your liking and needs.


For 2109...

I went with Ed’s Powershocks. They were not the cheapest, and the US to Euro exchange as well as shipping adds to the expense, but I decided on these because there had been some positive reviews on them, and the unique features that they have. They have a dial knob near the bottom, where you can dial the shocks to be set for either a soft or hard or anything in between. Chances are once you find your right setting you’ll never need to adjust it again, but who knows?
There are also two other feature which I liked about these shocks. One is that they have threaded collars, which seemed (and turned out to be) a very desirable feature to have to install and adjust them (height). The second is that the shocks themselves come with polyurethane bushings all around, as standard, which tends to balance the value of this option.


General Notes
That’s about all you need for to replace your rear suspension system. I won’t cover the installation details, as there are several sources that do so well enough, like a fellow owner’s “How To” on DMCtalk.com. I based my installation on that write up, and for the most part the suspension installation went well.  The job can get more challenging if you encounter"frozen" bolts and nuts. Fortunately I only had to deal with one stubborn frozen nut at the top of one of the shocks, but a nut cutter easily removed that obstacle. The other thing to check is the bushings on the links, if they are dry, rotted, or compressed, you may wish to consider replacing them, or even upgrading them with polyurethane versions (currently available at DMC-Europe, and in development at SpecialTAuto domestically).  Finally, the threaded collar on the shocks, mentioned above, did in fact make the installation easier, especially with this tool (found on Ebay).

Suspending the car on stands, and rotating the collar with this tool is a quick easy way to adjust the height of each shock..

In conclusion...
I have logged over 500 miles with my new rear suspension. Truth be told I believe the resulting effects are minor. I believe this to be the case because the full effect will not be reaped until both the front and rear suspension is upgraded.  Still the  rear suspension is now refurbished from the original factory components. The only issue that I have had has been a "squeek" sound from the shocks, but Ed advised me, and it has happened, that this goes away over time.


Epilogue
I could have left it at that, but instead I followed the “once you are there” philosophy, so I actually did some other rear suspension related work, mostly captured this (near) complete picture of the driver's side (LH) suspension:


What you can see, and what you cannot, that was done as part of the rear suspension work was:
 * Removed all the links to evaluate the bushings and to paint them.
 * Cleaned and painted the old springs.
 * Cleaned the parking brakes, and changed pads.
 * Replaced the worn parking brake cables.
 * Changed the rear flex brake lines with stainless versions.
 * Cleaned the exposed frame parts.
 * Cleaned off some road grime from the transmission.
 * Cleaned off the wheels
 * Removed, cleaned off, inner drive shafts
 * Replaced, outer drive shaft, bearings, and hubs.
 * Re-torqued all bushing related parts, and the trailing tab pivot bolts.
 * Cleaned off the interior of the wheels wells (not shown in picture).

Here is before and after shot of some of the visible parts and clean up work:


While most of those are details for another day, I would like to highlight a specific one mentioned above: "Replaced, outer drive shaft, bearings, and hubs."


Hub, bearing, and outer drive shaft
A secondary goal of this job was to repalce the rear bearings. I had the infamous "clunk" from the rear suspension when I got the car. It mysteriously went away one day and was replaced with a cyclic and surprisingly loud "squeek, squeek, squeek" on a turn. I figured it was the rear wheel bearings, that their time was up.

The wheel bearing is sandwhiched (machine pressed) between the outer hub and the carrier. To get it out requires a trip to the machines shop, to press it out, and to press it back in. Since I had to remove this assembly anyway, I figured I would clean it up and repaint it, but then it would mean two seperate trips to the machine shop, to take care of this. Also, the assembly is ulitimatly held together with a large 32mm nut, which needs to be tourqed to just over 260 ft-lbs.

I knew that I could tackle this, part by part, with some trips to a machine shop, and some brute strength, but I got an ideas to contact Josh B., at McFly MotorSports in Ohio. Although Josh's shop is relatively new to the DeLorean repair and restoration businesses, he is quickly gaining a great reputation for the service and quality work that he has put out, and some exciting engine performance upgrades that he has in the works (more info at this site).

Case in point, after contacting him, he sent me this picture of a recently restored hub/carrier assembly that he had worked on:

In this picture not only can you see the quality of the work on the hub/carrier and related suspension components,  but you can also see the quality of the restoration work of the frame that it is mounted on.

So, I engaged him to re-do my hubs, bearings, and outer shaft. Doing so all I did was to remove all three (carrier hub, bearing, outer drive shaft) as an assembly. This is what I sent:


...and this is what he sent back:


Given enough time, and having access to a media blaster, as well as two visits to a machine shop, some paint prep and paint time, I may have been able to achieve this quality of work by myself. However for what he charged, and how quickly he did it, it just made a lot of sense to have him perform this component restoration.

Contact him for more information:
Josh B.
McFly MotorSports
330.573.4129


>>> If you have a few minutes, be sure to check out the "Best of" postings. Thanks.<<

Saturday, April 11, 2009

DeLoreans Sold on eBay - 2009 Q1 Update

The 2009 Q1 Update of DeLorean DMC-12 sales on eBay is updated.

The data of DMC-12s sold for the last 29 months, is summarized in a graph and table format.

For the direct link click here.


I hope you continue to find this information interesting.
Thanks.

Monday, March 30, 2009

Sneak Preview: Dome Light Module - A Modern Replacement and Upgrade

(Edit 04/13/09:  Added installation picture of 2nd prototype, and link to a draft version of the installation & programming manual, at bottom of this posting.)
(Edit 02/21/16:  Updated links for Dave's website of related products.)

Following this blog's theme of modern upgrades for the DeLorean DMC-12, I am pleased to announce that I and another DeLorean owner have been Beta testing a really neat device for our cars, a multi-mode replacement for the original Dome Light Module.
Solid State, Mode Programmable, Dome Light Relay.
The device is engineered by Dave McKeen (aka Bitsyncmaster on the forums), who previously re-engineered and currently sells a modernized solid state replacement for our RPM relays (reviewed here: "RPM Relay, A Modern Update". I have been using a breadboard version this new module, throughout our Florida Winter months, and have been offering Dave feedback and suggestions on functionality. For the most part it works great, and it is really neat (and cool) to have the light dimming functionality back into our interiors, when you utilize energy (battery) saving LEDs in the interior.
The original module was basically a timer circuit, to dim the interior console lights, but as it was designed over 25 years ago, it does not work with modern LEDs. The fix to this date has been to just remove the module (the white one in the fuse relay area), and the LEDs ran fine but in an on, or off, state.

(BTW: Picture above is the result of my fuse/relay area clean up project, from a few months back.)

In Dave’s re-engineered unit, the timed dimming functionality is back, along with a few other nifty modes.
Mode 1: OEM operation.
In this mode, the module behaves as a direct replacement module, where after 15 seconds of the doors being closed, the lights dim until they are off. With this module however, this feature works if you run either incandescent, or LEDs. (For a good reason to run LEDs, see here: "LEDs are Cool" ) Dimming and LEDs, are a near oxymoron, unlike an incandescent bulb that can be made to increase and decrease its light output with voltage changes, LEDs are either on or off at one voltage.
So How does Dave make them dim?
Techie answer: he seamlessly pulsates them until they dim off.
To the casual observer answer: Freakin’ magic.
Mode 2: OEM operation plus a 10-minute shutoff.
This mode is as above, but also automatically shuts off all interior (including door, bonnet, and engine bay) lights after 10 minutes. Although this is less of an issue with LEDs, it is a great feature if you are still running incandescent bulbs, in order to avoid excessive battery drain. With this module in this mode, I’ve driven to car shows, or have left the car open in the garage, and sure enough it becomes one less thing to think about when your interior lights are shut off automatically.
Mode 3: Parade Mode
This is a new and entertaining feature, this is basically Mode 1 but instead of the lights staying on, they blink on and off.  If you shut off the interior lights, then the effect is solely focused on the doors. This would be neat to run, say in a night time car show, especially with multiple cars, or as the cars drive by a parade, with the blinking door lights – talk about giving our doors even more of an airplane like wing look.
Mode changes
In order to change modes, you don’t have to go unburying the fuse/relay area. Instead you can program the module with the light switch from the glove box. As you program it, by pressing the light switch in a certain sequence, the unit provides feedback as to the new program through, interior light pulses.

Beta Version 2 (Pre-Production unit).
Right before I began to perform a DIY rear suspension upgrade on 2109, Dave shipped out the latest revision to the module (see picture below). Gone is the breadboard test unit, the latest version is dimensionally now closer to the production unit, where it would look like a plug in replacement, with some minimal wiring to ensure full and future support of features.  The workmanship is impressive on the scale that it has been done, with tiny surface mount components mixed along with some small chips, soldered on two stacked circuit boards - but you won't be able to see this on the production boards as it will be a solid, potted, unit.  As Beta testers, we are now switching our review and feedback to this new unit, so it may be a few more weeks until the module is ready for sales and general distribution.

...in conclusion
Like Dave’s previous product, the solid state RPM Relay, this new module is a modern upgrade for aging, unreliable, and outdated electronic components in our cars. Dave has demonstrated to our small community that his products are reliable re-engineered components, and that he stands behind his product. This one is as clever and useful as his last, but this one is also just downright cool to see in action, as your interior LEDs dim.
I will post a small video later, stop by again to check them out. Thanks

To contact Dave about his upcoming Dome Light Module: 
http://dm-eng.weebly.com/
or
PM “Bitsyncmaster” on DMCTalk.org


-----------------------------------------------------------------
Addendum 04/13/09:
The 2nd prototype has been installed and is working great. With some additional wiring at the time of installation, it brings some new neat functionality.  Below is a picture of the unit installed:


(Click on picture for a larger view.)

As previously discussed, the shipping version will be potted units, so it will look even better installed than the picture above.

Also, we've completed a first draft of the features, installation, and programming document. You can find it at DMCTalk.


>>> If you have a few minutes, be sure to check out the "Best of" postings. Thanks.<<<

Saturday, January 31, 2009

Detailing the Engine Bay, Over Time

Addendum July 2012:  Appended pictures of updated engine bay. New AC compressor, new overflow coolant hose, general component cleanup.


Addendum August 2010:  Appended pictures of new engine bay harness, routing details.

Part of the maintenance and upkeep that I perform on this car, has to do with the engine and engine bay look. In this month’s entry, I will outline what I (and others) have done to detail and keep this part of our cars, looking as good as possible, providing some added benefits as well.

Our car came from the previous owner with a well maintained and nicely looking engine and engine bay. However, I noted some room for improvement that I figured I would address over time, and have in fact proceeded to do so over the last two years. My goal was to not deter too much from the stock look, just to refresh it.

My baseline and current progress
This is how the engine bay looked like two years ago, not a bad baseline:


This is how it looks like today:

In some cases the changes are subtle, out of view, and not as apparent as when seen in person, as opposed to in pictures.

The following are discussions of specific areas and/or parts that have been detailed in the engine bay area on this car.

Air inlet pipe
One thing not stock on either of the pictures above is the absence of the air inlet hose which runs between the coolant bottle and the air filter housing. On 2109 this was replaced a while ago, and if not I would have done it myself for cosmetic and performance reasons. Both DMC and SpecialTAuto.com sell this, each respectively name it "performance intake" or "performance cold air input" hose. These kits replace the stock soft plumbing, along with the a manifold valve and feed. The removed parts existed to warm the intake air, upon start up, specifically for colder climate conditions. Since this is a car used year round in the Southeast, and most DeLoreans don’t run in the Winter, this is an area for improvement. There may also be advantages to removing the stock assembly, because the original valve assembly tended to restrict a portion of the air flow into the engine.

Cost: Approximately $30 from vendors, or there is something similar available at local parts store, but if you can, support our vendors – our cars need them to be around. This is a simple DIY project.


Coolant Bottle
If you are still running with the original plastic coolant reservoir bottle – change it. Not to improve the look of your engine bay, but as a good preventive measure. Those original bottles were prone to bursting with cooling system issues, the modern bottles are made of stainless steel, and look great in the engine bay.

Cost: Approximately $140. from both DMC and SpecialTAuto.com (but the latter includes the mounting brackets).


The “valley of death”(VOD) job.
A VOD job on our cars is a must do if you are not sure how long it as been since something similar was done. Essentially this is a clean up and preventive measure, for the top of the engine block. That area is not normally visible as it is directly covered by our intake system, but underneath there, our block has some deep cavities, that over time collect grime, leaves, twigs, miscellaneous parts that fall in, and in some cases even dead rodents(!). This same area, specifically the cavities, have been known to get eaten away with years of corrosion, and sometimes creating, or contributing to create, block damaging cracks and holes – thus the “valley of death” moniker.

The job is not that difficult if you are handy and comfortable with working on cars, but best left to qualified DeLorean vendors otherwise. There are great documentation topics of VOD jobs on DMCTalk.com, so I won’t attempt to cover it here, but I did perform this project on 2109, during July 2008 (and with online assistance and support from other owners, enthusiasts, and vendors). I summarized the entire experience in a short youtube video as follows:


As you can see from the video, this project is an opportunity to clean up the area, coat it with a protective paint, and even replace some potentially future trouble parts in that area (sensor, water pump, thermostat, internal hoses and their clamps). Some specific detailing performed were:

Under the intake, the top of the block.
The picture below shows this area cleaned (Simple Green, soft wire brush, dry off, repeat many times) now painted (POR-15), along with several replaced components.


Performing this job is also an excellent opportunity to clean up some parts that need to be moved out of the way, while this job is underway.

Rewired main harness – notice that in the pictures above there in an unobstructed view into the air mixture screws, above the intake W-pipe, or intake horns. This is because the main harness was re-routed to go under the passenger side of the intake. In a stock DeLorean the harness comes across and above the top of the driver’s side of the intake.


Cost: This modified harness (Part #:110185) is available from DMC for just under $200., but other owners have taken their original one apart and reorganized it, to accomplish the same effect.


Clean and paint components
The picture above also shows several brackets that were painted, they were originally black with grime and dirt. The intake manifold is a chrome plated Ebay find, that sat on my shelf for over a year awaiting this project. A good sandblasting and painting of your existing one, will most likely yield a major improvement to this prominent part on your engine bay.

The picture below shows a before and after of 2109's air mixture unit, cleaned as discussed above, and painted with Duplicolor Gold and Aluminum colors.


…and before and afters of the throttle assembly:


Cost: I suppose if you have this done, this could easily run well over $1000. in labor alone. As a DIY project, it cost me about $480 in parts and 75 hours (by myself, with some minor complications (seen in video), and I don’t work fast as I took plenty of breaks, and took lots of pictures, done on weeknights and weekends over a 6 week period. Others have done the basic work in much, much less time.


Valve Covers
They are very prominent in the engine bay, so these are on the top of a list for cosmetic improvements. The driver’s side is the most tricky to take out, because you have to temporarily relocate the bulky compressor with its lines attached, but overall this is just an unbolt, paint, bolt back on procedure. The picture below shows the passenger side cover after it was painted and reinstalled, unfortunately the air intake covers a large portion of this one.


Cost: I can only comment on a DIY solution and it was less than $20 for one can of spray paint, and some replaced bolts.


Ignition Resistors
Because of their location and its color, a cleaned up ignition resistor adds a nice tidy detail to the overall look of the engine bay.


Cost: Your time to scrub away, I used Simple Clean and a soft-ish wire brush to work off the grime.


Vinyl Caps
This is a relatively simple one, the AutoParts store sell a pack of PVC caps for about $5.00. These caps can be used on your door plungers, and also to cover up those two bolts on the left side of the bay (pictured below) and even the ground lug on the opposite side.


A/C Compressor
Another prominent part in your engine bay, is the A/C compressor. This is a tricky component to clean up or exchange, because it entails extracting and recoveing all the Freon, before you can disconnect the compressor. As I am doing, unless there is some major A/C service to be done I will leave mine as is - but this is definately another prominent part of your engine bay so it is definately an area to clean up.


A/C Idler Bracket and Pulleys
This one you can argue is both a cosmetic and an upkeep item. If you are running the original pulleys and bracket, chances are they can use a good clean up and your bearing may not be at their best. Replacing the bearings on the pulleys also yields a slightly quieter running engine.


Cost: You can do all this work yourself, but SpecialTAuto.com can send you the bracket and pulley as shown above, for about $50 plus shipping and a $100 core charge, which is refundable when you send him back your old bracket/pulleys. SpecialAuto's pulleys with new bearings, are definately not as noisy as my original 27 year old pulleys.


Engine Bay Light
Here's a quick project, how about replacing that old yellowed engine bay light? The merits of that light are debatable; however, since it's there may as well update it with a newer one.

Below is a before and after shot:

It's a subtle change, but it does overall contribute to a clean up.

Since I was going to replace this light, I decided to also incorporate a simple mod. I often find myself wanting to be able to turn off this light (daytime, engine lid up), and to do so, I'd have to unplug it at the switch (by the lid hinge) and remember to re-plug it. A better solution would be for the light to have a switch. The picture below shows a comparison of the orignal and the new housing with the light switch mod (also note comparative condition of conductive internal brackets).


Cost: New old stock lights are available from DMC (or your local DMC Dealer) as part number 100439, the current price is about $27.


Painting the Engine Bay
This is best done with the engine out of the bay, however, very impressive results have been achieved by a local Florida owner without removing the engine.
He documented the experience and results here: Deloreanreborn.com


Customization
Although not in my sights nor current plans, there are custom components available that can be integrated into your engine bay, for that different look. A short list of those are:
Stainless air cleaner unit (SpectialTAuto.com)
Braided stainless fuel lines (SpectialTAuto.com, and DMC-CA)
Different color vacuum lines (cut to size as a kit, at SpectialTAuto.com)
Nology kit, with beefier spark plug wires (DMC)
Custom stainless throttle cover (www.robomerchant.net/DeloreanCarShow)


Conclusion...
So that’s it, as you can see with time, and a little elbow grease every now and then, you can make some visual improvements to your car’s engine bay. Many of these improvments are also good preventive measures, which will contribute to provide you with many more enjoyable DeLorean miles ahead.


Addendum 08/12/2010
There are often questions, and I had a bunch, of how to route the new engine bay harness.  Below you will find 4 pictures, the first my questions about routing prior to installing the new harness.  The next three pictures, address most of the questions of the first picture, as they are pictures after the harness was installed.  (You can click on the pictures for a larger view.)

Questions, questions, questions, I had....

How it turned out/answers...


------ If you have a few minutes, be sure to check out the "Best of" postings. Thanks.------

Wednesday, December 31, 2008

DeLoreans Sold on eBay - 2008 Q4 Update

The Q4 Update of DeLorean sales on eBay is updated.

This is from data for the last 26 months as of December 2008, and it shows the resulting trends.

For the direct link click here.

I hope you continue to find this information interesting.
Thanks.

Sunday, November 30, 2008

LEDs are cool.


Intro
I’ve been working on my engine bay as funding and time allows. One of the first updates that I did in this area was to modernize the engine bay's light, to an LED. You all know by now the advantages of LEDs (lower current drain, less heat), but I thought it would be interesting to document here the actual temperature differences.

Details
For these tests, I popped the lens/cover out form the housing, and began readings with the current LED that I am running. First I took an ambient temperature reading. (The instrumentation used is an EXTECH multimeter, with an IR Temperature sensor.) The first picture below shows an 81F (27C) ambient temperature.


Energize! This next picture is the temperature reading on the same spot, of the LED light, as you can see there is no measurable temperature rise. Perhaps over time it may go up a degree or so, but it never feels much if any, warmer than ambient.


Next up is our old friend the incandescent bulb. The temperature began to rise quickly, I snapped this first picture at 231F (111C)…


...and I stopped after this picture, at 278F (137C):


After a brief cool down, the bulb was literally too hot to handle.


...which is about where it stabilizes at, which is nearly 200F (110C) above ambient with the lens cover off! Imagine opening the engine bay and activating this light, on a warmer day, and with a warmed up engine bay, and it is understandable how those added degrees could contribute to a 27 year old plastic housing meltdown. : (


Summary:
So, as shown, it’s no surprise that every now and then we see or hear of a melted engine bay light housing. It's one of those "factory quirks" our cars have. Oh, and by the way, the internal cabin dome lights (above rear view mirror, and on rear shelf) are made to have the same incandscent bulb, housed in ...another plastic housing.


References
So this is a simple fix, go to your favorite vendor and order an LED replacement light kit.
DMCH (or your local DMC facility) have them for $1.99 each (#SP11305).

The one that I have pictured is not a DMCH product, it is from www.superbrightleds.com. Specifically, these are their Festoon bulbs (4210-WHP6)

Picture from: www.superbrightleds.com/specs/festoonhp.htm

They're relatively expensive at $15 per bulb, but what is neat about these is that not only are they bright, consume less power, run cooler, but they also carry them in a “warm white” option. This is different from the typical LEDs that have a blue-ish hue to them. The “warm white” options tries to duplicate the warm, light yellowish, color of an incandescent bulb – and it’s pretty close (I used their equivalent “warm whites” on my dash, and I really liked how that turned out). This color option is closer to the look of an 80's car, where as the typical blue-ish LEDs seem (to me), not in line with the car's vintage.

It’s tough to capture in pictures, but the first picture above is the best shot, in the dark, in an attempt to capture both the illumination and color of this bulb. Had I used the “cool white” you would have seen a bluish tint on the picture.

Unlike the incandescent version, these are directional, that is they only illuminate on one side, and per their spec, on a 120 degree light arc. I haven't found this to be a problem, and again you can reference the picture above to see the result.

Oh ... and if you do order them through SuperbrightLEDS.com, don't use this bulb on the interior, it is much too bright for that application.


>>> If you have a few minutes, be sure to check out the "Best of" postings. Thanks.<<<

Thursday, October 30, 2008

Modernizing Your Spare Tire, Minimizing a Flat Tire's Hassle and Cost.

Prologue
Every time we start up our cars for a drive, no one plans for a flat tire – but I am sure that it has happened to us at least once, and if it hasn’t then it’s only a question of when, it will happen. For DeLorean owners, if you have your original donut style spare, you are relying on 27 year old rubber, assuming that it can even sustain pressure. There are written accounts on forums about owners changing a flat to the spare and rolling for a few feet, before the spare disintegrates. This article is an attempt to offer an option, to prevent such an occurrence.

DeLorean, original, 27 year old wheel and tire.

The Spare Tire Issue
As with nearly all DeLorean issues, this is not new and some owners have actually taken several approaches such as eliminating, not carrying, the spare all together and ride with either Slime Sealant and a 12v compressor, AAA coverage, or just with a cell phone and credit card to call for a tow.


Current Solutions: Green Slime Sealant

Sure, Slime Sealant is a temporary solution, but it may not always work depending on the severity of the flat, rim damage, and/or how far you need to go to address the issue. (Also, if you "slimed-it" let your tire repair person know, 'cause it's going to be a messy cleanup.)


Current Solutions: Call for a non-AAA tow

Now, I don’t know about you, but I would rather change a flat with an available spare and keep moving, rather than wait in the middle of nowhere, and then pay for a tow to take the car and I home. A few times a year I do a 500 mile round trip to visit my son in college and meet up with the Central Florida DCF guys in my D, that trip is often through wide open and nearly remote areas. Should I get a flat on those trips, I’d rather address it, and move on, as I would do with my daily driver.

Current Solutions: AAA

AAA coverage is generally a good deal, but there are limitations to the amount of miles they will tow, and how many tows reimbursed per year.


Again, all the above are certainly viable solutions, but they may not work in all cases nor for everyone. So...


A Modern Replacement
So this was my goal: To modernize the DeLorean’s spare tire so that it would become a viable solution for both local and distance travel.

My search and personal preferences led me to updating the spare tire, with more modern rubber, as well as being a solution that would still fit in the wheel well (diameter and width), and since I retained the original wheel, it eliminated the guess work in which wheel would fit, and it even sort of still looks stock.

Our Donut Spare
There is no mystery about donut spare tires. Similar to our daily radial tires, they are tubeless rubber tires on metal wheels, and regulated by DOT (Department of Transportation) standards just like normal road tires. The big differences between it and your regular tires are in as follows.
Size: as they are made more compact for storage
Speed limitations: are not meant to be run at high speeds,
Mileage limitations: are not meant to be driven for any extended amount miles, just enough to get you a tire repair service station or home.
So, knowing that it should be a simple replacement.

DOT Nomenclature
First some important nomenclature on tires: DOT has specific marking regulations for tire manufacturers, to designate important information beyond size and fit suitably, notably the tires contain information on their manufacturing history. In order to update our spares, we need to be aware of these two markings, size and date of manufacture.

Size Codes
Our spares are sized for T125/70D15, which as most of you know this is the standard description for modern tires. Breaking it down:
"T" denotes a spare tire
"125" is the widest sidewall width (or 125mm)
"70" is the profile ratio of the sidewall's height, to the width (70 denotes 70% of the 125mm width, or 87.5mm)
"D" denotes a diagonal bias tire
"15" represents the wheel mounting diameter (15 inches)
Yes, this is an odd mix of metric with English units, but it is the standard.

Date Codes
This information is just as important as above because there would be no sense in replacing your old tire with something just as old. I have read that the general rule is to replace ties beyond 8 years old; however, I don’t think many people (or dealers reselling used cars) are doing that with spares, and I suspect that as long as the tread is good and that they hold air, they may have a slightly longer life. Rubber over time deteriorates as it looses its deformation properties and can harden; however for this to happen, there are also factors of environment, exposure, and usage that play into the longevity.

So, the goal is to replace your 27 year old tire with something newer. To do so, the key is to look at the stamped DOT codes to guide your replacement selection. After 2000, all tires have a two digit number to signify the date of manufacture. Easy enough, however, prior to 2000 only one digit was used, to denote the year of the decade. So a 1997 and 1987 tire would each end in an ambiguous 7. The recommendation then is to look for a 21st century tire, it will be easier to select and assure you a newer tire. The two digits before the year code, represent the week of manufacture.

For example, the picture below shows the code from my original spare, note it ends in “171”. This is a tire manufactured on the 17th week, of 1981. Visually the wheel does look in good condition, other than it could not hold pressure for over a few weeks – again, the hardening of the rubber may have accounted for that.


Where do find a newer tire?
Oddly enough I didn’t really find anyone selling spare wheels directly to consumers, and that is fine as I suspect the price would have been high, so alternative resources at your disposal are junkyards, ebay, or craigslist. Tip for looking on ebay or craigslist is to search for: T125/70D15. You will find that this is a very common size in spare tires, used on many, many vehicles so availability is actually quite good. Just make sure that you get a wheel manufactured after 2000, ask the seller for confirmation as most likely this information is rarely published.
Picture below is the spare that I found, note "0504" designator to denote a 2004 year of manufacture, and n the 5th week of the year.


Chances are also very high that you will find this tire, with it’s own unique wheel, so let’s address that next.

The Wheel
As the DeLorean's spare tire is a still commonly used size, you will find that it is mounted on a variety of wheels, and wheel patterns, depending on their host visibility. The picture below is from the spare wheel/tire that I found - from a 2001-2004 Kia Rio.


Later model Honda Civics in particular also use a 4 bolt wheel on the same tire size that our Ds use; however, it is unlikely, as in above, that that the wheel can be used due to different offsets and brake caliper configurations. Each host wheel seems unique for their specific application.

So, the recommendation is that if you find an appropriate sized good looking spare tire (some are never used), regardless of the wheel, get it and change it out with your existing DeLorean spare wheel. Any local mechanic can do that for you for a few bucks.
(I'll post a picture later of my new spare tire, on the original DeLorean wheel.)

Cost
You will find that newer spares (from 2000+) are not as readily available as 1990s spares, so keep looking around. I generally saw prices anywhere from $10-$50, but factor shipping for online transactions.

If you are curious, below is a premade search link, that displays a search for T125/70D15 spares on ebay:
Click Here for eBay Search Results.


Summary
So that’s it, once you find your tire, remounted on your existing wheel, you are ready to mount it back in the original location and drive knowing that you are ready to address a spare tire change should it be needed, and it was done for much less than the price of a tow. For you owners about to, or that have begun to, hibernate your cars for the Winter, this could be the right time for this simple project.


Epilogue.
...or are you really ready to handle a flat, even with your new updated spare?

How would you change a flat, with your OEM jack?
Have you checked it recently?
If your on the road, and change your flat where do you put the flat as the fronts fit in spare wheel well, but the rears won't? (Tip: Best option for the rear tires is the rear luggage carrier if you have it, otherwise the passenger seat works if you don't have a passenger, otherwise tie it down temporarily to the engine mount cover.)
Seriously, if you haven’t tried it, perhaps while in your car is safe and snug in your garage or driveway, you should simulate a flat tire change on your own D.

I did that once and discovered that the my jack was flimsy, the ratchet tool for lifting the jack stripped out on use, and I didn't even have a 17mm wrench to remove my aftermarket front strut bar to access my spare! That quick exercise was an eye opener and has since been corrected by carrying the appropriate tools for the job on every drive. You should try the same, especially if you are going to modernize your spare.

>>> If you have a few minutes, be sure to check out the "Best of" postings. Thanks.<<<